You can switch between 3D and 2D views at any time - even when animating.
Controls
|
 |
|
Compass Indicates and changes
which compass direction is shown at the top of the display. The yellow line
indicates North. Click within the red circle and then drag the yellow line
to point in the direction of North.
Using this control, you can rotate the star chart 360°.
|

|
|
Star Magnitude Use the Star
Magnitude listbox to control how many stars are shown. When first getting
oriented, select a low Magnitude number like 2 or 3.
|
|
Magnitude |
Number of Stars |
|
0 |
4 |
|
1 |
15 |
|
2 |
48 |
|
3 |
170 |
|
4 |
513 |
|
5 |
1604 |
|
6 |
5023 |
|
7 |
9046 |
|
8 |
9096 |
|
|


|
|
Zoom The ZoomIn and ZoomOut
buttons let you control the magnification from 1.0 to infinity.
|

|
|
Home The home button removes
all scroll and panning effects. The stars shown in the green "X" at the center
of the screen are directly overhead.
|

|
|
Objects Displays a dialog controlling
the objects to display on the star chart.
Hint: Orbital Paths
are compute intensive and will slightly decrease the speed of animation.
|

|
|
Clock Displays a menu controlling
time and animation |
By Hour
By Day
By Week
By Month |
Selects the unit of time used for animation and stepping. |
Step +
Step - |
Step one increment of time forward or reverse. |
Animate +
Animate -
Animate Stop
|
Continuously animate time forward or reverse or stop animation. |
|
Realtime |
Keep star chart synchronized with the device clock. |
|
Select... |
Select a particular time.
|
Right Click
|
|
|
|
If you right click with the mouse on the star chart, a menu is displayed
showing frequently used options which affect the chart presentation.
Zoom - select from a number of common zoom settings.
Horizon - select a horizon to view or zenith.
Horizon.Flip East-West is used to mirror the star chart vertically,
switching the position of East and West. When viewing the screen overhead,
in line with the stars, leave this unchecked. When viewing the chart with
the screen on a tabletop, check this item.
Info... Show information about the selected object.
Center - center the selected object on the screen.
|
World Pages
|
|

|
|
Click the World Icon to activate the setup and Sight Reduction pages
shown below.
|
|
|
|
Latitude and Longitude
The LatLong Page establishes the central viewing point for the sky as
well as the Assumed Position for sight reduction calculations
using a sextant.
There are four different ways to select your position. You can
drag the cursor over the world map, select a country and then a city from the listboxes,
enter your position in degrees, minutes, and seconds, or click on the GPS button
to set your location via a GPS receiver.
The first 4 entries in the city list are "Custom", user programmable
locations which are retained across invocations of Pocket Stars. You can edit
the text designation ("My Backyard") and set Lat/Long either via clicking on the
map or manually entering the coordinates.
The map also displays the position of the sun and portions of the world
in daylight and night.
|
|
|
|
Time Page
The Time Page is used to set the Time Zone as well as two different time
values.
- The time to use for the star chart.
- The time a moving vessel arrives at the Assumed Position set on the
LatLong page. This value is only used for celestial navigation on a moving
vessel.
Time Zone contains three options for controlling the local offset
from UTC (Coordinated Universal Time).
- System Clock - use the time zone specified by the device clock.
This is controlled by "Start.Settings.System.Clock".
- Longitude - Uses the current geographical location (specified
in the LatLong page) to calculate Zone Time. While correct for many locations, this
method does not take into account the effect of political boundaries.
- Custom - Enables a list box to manually set the Time Zone.
DST is a checkbox which specifies whether Daylight Savings Time
is in effect. This control is only enabled for the Longitude and Custom
methods of controlling the Time Zone.
Realtime specifies that the clock in your Pocket PC is used to
set the star chart time when checked. If this control is not checked, you
can select a different particular time, and the star chart is static.
as UTC specifies that the time fields are in Coordinated Universal
Time rather than local time.
Set arrival time at Assumed Position should be selected to specify
the time when the vessel was at the location set on the LatLong page. This
step is only important when calculating a celestial navigation fix on a moving vessel.
|
|
|
|
Environment
The Environment Page describes the local environmental conditions of
the observer. Although these settings will slightly modify the star chart
display, they are mainly used when performing a celestial navigation fix.
Vessel speed and Course describe the movement of the vessel.
Height above sea level sets the observation height of the sextant.
DIP Short horizon allows observations to be made when the true
horizon is not visible. If you know the distance to a shoreline or other fixed
body, check this box and enter the distance in nautical miles to the shoreline.
Index correction specifies the required correction to zero the
instrument error of the sextant in minutes of arc.
Temperature and Pressure set the local conditions which
affect atmospheric refraction.
Use STP stands for "Use Standard Temperature
and Pressure", which resets the Temperature and Pressure fields to their default
values.
Disable DIP, index, and refraction calcs (calculations) let's
you input pre-corrected sextant altitude measurements. If checked, this
also disables corrections for refraction on the Alt/Az position readout
in the upper left corner of the main star chart.
|
|

|
|
Sextant Page
The Sextant Page is used to perform a celestial navigation sight reduction.
Here you can select a body or star for observation, and then input the altitude
measured with a sextant (Hs).
Body and Star fill the listbox with Bodies and Stars respectively.
If you have selected a body in the star chart it will be displayed by default.
Now sets the time fields to the current time.
Last sets the time fields to the last calculated LOP.
UTC when checked indicates that time values are in Coordinated
Universal Time rather than local time.
Altitude is where you enter the altitude to the body measured
with a sextant. You can enter this as either decimal degrees, or as degrees
and minutes.
Calculate performs for the sight reduction for the given body,
time, and sextant altitude.
The result is shown in red in the lower left portion of the display as a distance
toward or away from the Apparent Position along the Azimuth of the body.
Save LOP saves the current LOP.
Details displays all of the intermediate results for this LOP.
Hint: Clicking on the
red Altitude text fills the (Hs) edit box with
the approximate calculated values for the selected body. This is just to make
data entry easier.
Hint: You can click
on the red text to switch the format of the results:
DD° M.MMM' (degrees, decimal minutes)
DD.DDDD° (decimal degrees)
DD° MM' SS" (degrees, minutes, seconds)
|
|
|
|
Details Page
The Details Page shows all of the intermediate results used to perform
a sight reduction and calculate a line of position.
Hint: You can click
on the buttons at the bottom of the page to change data formats:
DD° MM' SS" (degrees, minutes, seconds)
DD° M.MMM' (degrees, decimal minutes)
DD.DDDD° (decimal degrees)
|
|
|
|
LOPs Page
The LOPs (Line of Position) Page is used to calculate an improved fix
from two or more LOPs.
You can select from amongst the previously acquired observations by checking
the associated checkbox.
The results are shown in red text in the lower left corner. These
include:
- Corrected Assumed Position
- Bearing and distance to corrected AP
- Most Probable Position (MPP)
- Standard deviation of measurement error
The standard deviation of the estimated position (sigma) is expressed
in nautical miles. Generally, this value will decrease as the number of observations
increases.
Graph draws a graph of the selected LOPs along with the AP and
FIX.
Details shows the intermediate results for a particular LOP.
Remove deletes the selected LOP.
The example shown to the left is taken from the Nautical Almanac for
the Year 2001 page 283.
Hint: You can click
on the red text to switch formats:
DD° M.MMM' (degrees, decimal minutes)
DD.DDDD° (decimal degrees)
DD° MM' SS" (degrees, minutes, seconds)
|
|
|
|
Graph Page
The Graph Page plots the lines of position enabled on the LOP page.
The Apparent Position is centered on the screen (the blue square), and the various
observations are plotted with the endpoints labeled with the measurement index (the
red lines).
The best fit to the measurements is plotted in green, and is labeled
FIX.
If a speed and course have been set on the Enviro page, the vessel course
is shown as a dotted gray line passing through the fix.
A 95% confidence ellipse is drawn centered on the FIX. The shape
of the confidence ellipse depends only upon the number of observations and the distribution
of the observations in azimuth. The size of the ellipse depends upon the observation
errors.
The example shown to the left is taken from the Nautical Almanac for
the Year 2001 page 283.
Hint: You can click
on the graph to get the Latitude and Longitude of any point. Clicking near
the endpoints of any observation displays the details of that observation at the
bottom of the screen.
|
Main menu dialogs
All of the dialogs in this section are accessed from the View and Calculators menus.
|
|
|
|
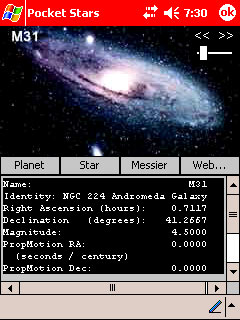
Info Page
The Info Page shows additional information about the selected body.
Tap-n-hold on the main star chart to display the Info page.
Press the "Planet", "Star", or "Messier" buttons to display objects of
each type.
Hint: Use the slider
control in the upper right corner of the screen to scroll rapidly through all of
the bodies. Or use the << and >> arrows in the upper right corner
of the screen to decrement and increment by one.
|
|
|
Rise Set Page
The Rise Set Page show the rise, transit, and set times for all bodies.
Select a date using the calendar at the top of the page, or use the <<
and >> arrows to move a single day forward or back.
UTC switches the display between local time and UTC.
The bottom line displays either "Standard Time" or "Daylight Saving Time"
depending on the date selected.
|
 |
|
Lunar Phase Page
The Lunar Phase Page shows an animation of the phase of the moon for
a month long period.
Select a month to view by using the calendar at the top of the page.
The graphic at the top of the page shows an animation of the relative
positions of the moon, earth, and sun (obviously not to scale). If you click
anywhere on the calendar, the animation stops and the lunar position is shown for
that particular day. If you click outside the calendar, the animated display
resumes.
Note that in this month, the display shows a
blue moon. The blue moon definition employed here is the "second
full moon in a calendar month" version invented in March 1946 and foisted on an
unsuspecting world by Sky and Telescope. For a fascinating look at the various
definitions of blue moon, look
here.
|
 |
|
Great Circle Distance Page
The Great Circle Distance Page calculates the shortest distance between
two points traveling over the surface of the earth along with the initial
course from LatLong1 to LatLong2.
Assumed Position loads either LatLong1 or LatLong2 with the current Assumed
Position.
Calculate performs the great circle distance calculation and initial
course. You may select output units of NMi, statute miles, and kM.
Earth Model specifies the shape of the earth used in the calculation.
Spherical assumes a perfectly uniform, spherical earth where 1' = 1NMi.
NAD83 (North American Datum of 1983) is an earth-centered datum based on
the Geodetic Reference System of 1980. The size and shape of the earth was determined
through measurements made by satellites and other electronic equipment; the measurements
accurately represent the earth to within two meters.
|
 |
|
Range and Bearing Page
The Range and Bearing Page calculates resulting LatLong given a starting
point, along with a range and bearing.
Assumed Position loads LatLong Initial with the current Assumed Position.
Distance may be expressed in either NMi, statute miles, or KM.
Course is expressed in degrees true.
Method allows selection of either "Rhumb line" (constant compass
bearing) or "Great Circle" methods of computation. Both methods will give
identical results for short distances and angles which are multiple of 90°.
Calculate performs the range and bearing calculation. The
Results window contains the resulting LatLong.
|
 |
|
Horizon Distance Page
The Horizon Distance Page calculates the visible horizon for both visible
light and radar signals.
Height of eye or radome specifies the eye height of the observer in either
feet or meters.
Calculate performs the horizon distance calculation.
Hint: You can determine
the distance at which an object of known height will be visible by adding the value
to the height of the observers eye.
Example: We're sailing
to Tahiti, and wish to know how far away land can be detected. We know that
Mount Orohena is 2241 meters high, and our eye height is 3 meters. Enter 2244
meters ( 2241 + 3), which gives the result of 98 NMi.
|
 |
|
Preferences.General Page
Star chart Time format controls the format in which time is displayed
in the upper right corner on the main star chart. Choices are "Local Time",
"Local Sidereal Time", "UTC", and "Greenwich Mean Sidereal Time".
Smart Zoom if enabled, automatically sets the star magnitude control
on the menu bar as the chart is zoomed in and out to reduce screen clutter.
Small Fonts uses a smaller font on portions of the star chart.
Show Altitude/Azimuth (else RA/Dec) if enabled shows Altitude/Azimuth
in the upper left corner of the star chart. Otherwise Right Ascension and
Declination are displayed.
|
 |
|
Preferences.Colors Page
Preferences.Colors is used to skin or customize all of the colors
used to generate the 2D Star Chart and 3D Orrery display.
Black/White/Red are choices in the first listbox which allows
selection between three different color schemes. Each color scheme is independent
from the others and can be individually customized.
Default returns the selected color scheme back to the original
settings after user confirmation.
BackgroundSky... is a listbox containing the names of all the
elements on the star chart. To customize an element, select it in this list,
then either:
RGB enter the RGB (Red, Green, Blue) color components for the
element (0-255).
Choose Color displays a color selection dialog where a color may
be selected for the element.
|